
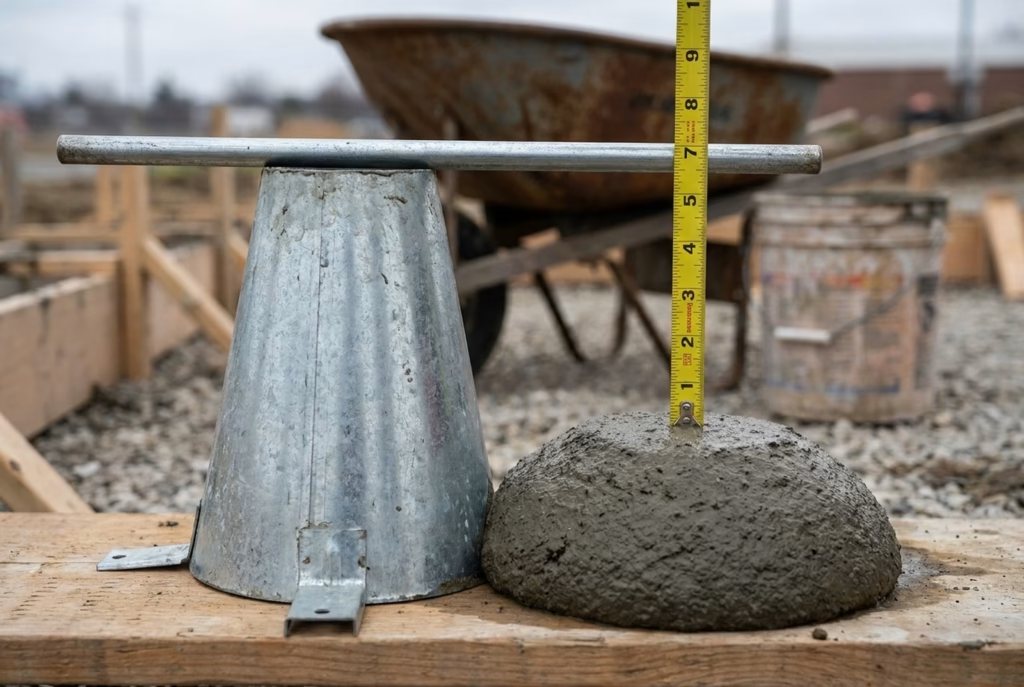
The slump test is the fastest, cheapest and most widely used field check on the consistency of fresh concrete. A sample of concrete is filled into a standard truncated cone, rodded in layers, and the cone is lifted straight off; the distance the concrete subsides vertically is the slump, reported in millimetres. It takes a few minutes, needs only a cone, a base plate and a tamping rod, and gives the technician an immediate read on whether a delivered batch matches the specified workability before it is placed. This guide covers the method defined by ASTM C143/C143M and the European equivalent EN 12350-2:2019, the cone dimensions and rodding technique, how to read true, shear and collapse slump, what slump does and does not tell you, and what to look for in a slump test set.
The mould is the Abrams cone, a hollow truncated cone made of sheet metal with foot pieces and lifting handles. Its standard internal dimensions are fixed in both the ASTM and European methods: 300 mm high, 200 mm diameter at the base and 100 mm diameter at the top. The base plate on which it stands must be flat, rigid and non-absorbent, and the tamping rod is a straight steel rod, typically 16 mm in diameter and 600 mm long, with both ends rounded. The cone is held firmly down against the plate during filling so it does not lift off or tilt when the concrete is rodded. The exact dimensions matter: a dented, bent or worn cone gives a false volume and a false slump.
The test is run on a freshly mixed representative sample, starting from the moment the sample is taken. EN 12350-2 expects the whole operation from filling to lifting the cone to be completed within about 150 seconds, so the concrete does not begin to stiffen or lose water while you work. The standard sequence is:
- Wet the cone and base plate, place the cone on the plate and hold the foot pieces down firmly.
- Fill the cone in three layers, each approximately one third of the cone height.
- Rodd each layer with 25 strokes of the tamping rod, distributed evenly over the layer; for the lower layers the rod should penetrate into the layer below.
- Strike off the top surface level with the cone rim, clean any concrete from around the base.
- Lift the cone slowly and vertically, without twisting or sideward movement, over a few seconds.
- Measure the slump immediately: the vertical distance between the top of the cone (300 mm) and the displaced centre of the top surface of the slumped concrete.
Not every subsidence is a valid slump. The standard describes three behaviours:
- True slump: the concrete subsides evenly and intactly. This is the normal, valid result and the vertical drop is reported as the slump.
- Shear slump: one side shears off and slides down while the rest stays put. This indicates a lack of cohesion in the mix; the test should normally be repeated, because the measured drop may not represent the true consistency.
- Collapse: the concrete collapses completely or slumps more than the cone height, or the slump continues to change for about one minute after the cone is lifted. The mix is too fluid for the slump test to be meaningful; EN 12350-2 notes that beyond about 210 mm slump the method is unsuitable and a flow-table or other consistency test should be used.
Slump is a consistency index, not a strength number, and the exact target is set by the project specification. The table below gives typical guidance bands; the governing concrete specification always governs.
| Slump (mm) | Consistency class | Typical applications |
|---|---|---|
| 0–25 | Very dry / stiff | Road and pavement paving, mass concrete, lightly reinforced sections |
| 25–50 | Stiff / plastic | Foundations, blinders, lightly reinforced beams and slabs |
| 50–100 | Plastic | General reinforced concrete, slabs, normal reinforced frames |
| 100–175 | Wet / fluid | Heavily reinforced sections, pumped concrete, columns with congested steel |
| >175 | Very fluid | Flowing mixes; slump test becomes unreliable — use flow table or self-compacting tests |
A higher slump means a wetter, more fluid mix that places and finishes more easily, and a low slump means a stiff mix that needs more vibration. Within a fixed mix design, slump is a useful quick check of water content and batch-to-batch consistency, and it will flag a load that is noticeably wetter or drier than the design. But slump is not a strength test, and it is not a general workability index: two mixes with the same slump can behave very differently under vibration, in pumping, or in resistance to segregation, especially with different aggregate shapes, binder types and admixtures. Slump is also unreliable for mixes with a maximum aggregate size above about 40 mm, for very dry roller-compacted mixes, and for self-compacting or flowing concretes. It should be read as one check alongside air content, temperature, density and cube strength, not as the whole acceptance decision.
Warning: if the same mix shows a changing slump load after load, or a sudden jump, check the water. The slump test is extremely sensitive to added water on site, and extra water that raises slump also lowers strength and increases drying shrinkage.
| Error | Effect on result | Corrective action |
|---|---|---|
| Cone not held down during rodding | Cone lifts or tilts; volume and slump distorted | Stand on the foot pieces or hold the handles firmly; keep the cone vertical |
| Rodding too deep, too hard or too few strokes | Over- or under-compaction changes the measured slump | Use exactly 25 strokes per layer, evenly distributed, rounded rod end |
| Lifting the cone sideways or twisting it | Shear or collapse induced artificially | Lift vertically and steadily over a few seconds, without twisting |
| Wet, dirty or absorbent base plate | Water film or loss changes surface flow | Use a clean, rigid, non-absorbent plate; wet but do not flood it |
| Test too slow after sampling | Concrete starts to stiffen; slump drops | Complete filling to lifting within about 150 s of sampling |
| Measuring from the wrong reference | Slump read against cone side instead of displaced top | Measure vertical drop from the cone height to the displaced centre of the mass |
A slump test set should include the cone with foot pieces and lifting handles, a flat base plate large enough to catch the slumped mass, and the 16 mm diameter tamping rod with rounded ends. Buy sheet-metal cones that are straight and rigid rather than thin and floppy; a cone that flexes during rodding will bias the result. For site use, a galvanised or stainless cone resists corrosion and is easy to clean, and a marked rod or a separate measuring rule makes the final height reading quick. A complete fresh-concrete set often bundles the slump cone with air-pressure metre, density basket and temperature bucket for a full field QC package. Materst supplies slump cones, tamping rods and base plates for concrete site and laboratory quality control, backed by 24 years of anti-corrosion engineering heritage and system-certified production.
The slump test stays at the centre of concrete site control because it is honest: it is simple, repeatable and fast, and it catches the wet or dry load that would otherwise be placed in the structure. Treat it properly — the standard cone, three layers of 25 rods, a vertical lift, an immediate reading, and a true slump that is not a shear or collapse — and it remains the first line of defence between a ready-mix truck and a placed pour. Read it alongside strength, air and temperature rather than on its own, and the slump test will keep doing the job it was designed for.
Sources and references
- ASTM C143/C143M-26b, Standard Test Method for Slump of Concrete — ASTM International store
- EN 12350-2:2019, Testing fresh concrete — Part 2: Slump test — iTeh standards catalogue
- ASTM C143/C143M sample standard: Summary of Test Method and Significance — ASTM International sample PDF
- Hoskin Scientific, Concrete Slump Testing: Methods, Equipment and Standards (CSA A23.2-5C / ASTM C143 guide)